URL

URI.js - Javascript URL mutation library

文档

它可以读取,修改 URI 字符串上的目录、路径、查询参数。

//yarn add urijs
import URI from 'urijs'

const host = 'http://misaka.im'

new URI(`${host}/admin` //http://misaka.im/admin

js-url - A simple, lightweight url parser for JavaScript

它可以解析当前 URL,提取你需要的参数。这里的 URL 只是单纯的统一资源定位符。有别于 SPA 应用的路由里的所有东西。

//yarn add js-url
import "js-url"

url('#poo');      // undefined 尝试获取不存在的参数
if (url('?') && url('?').refer){
    console.log(url('?').refer)
}

// 获取所有查询参数
this.page_query = {...this.page_query, ...url('?')}

new URL

移动端兼容性较好,不适用于 IE 浏览器!

var _url            = new URL(window.location.href);
var _version        = _url.searchParams.get("version");
var _refer          = _url.searchParams.get("refer");

表单校验

validator.js - A library of string validators and sanitizers.

一个包含了许多校验器的包,手机号,邮箱,字符长度。

//yarn add validator
import validator from "validator"

validator.isMobilePhone('13800138000', 'zh-CN')}

设备指纹信息

Fingerprintjs2 - Modern & flexible browser fingerprinting library

用于游客识别。代码运行环境是浏览器,没办法取得设备机器码,退一步只能计算各种信息生成身份码。

//yarn add fingerprintjs2

//fingerprint.js
import Fingerprint2 from 'fingerprintjs2'

export default function () {
  return new Promise((resolve, reject) => {
    new Fingerprint2().get(function (result, components) {
      return result ? resolve(result, components) : reject('Fingerprint2 err')
      // a hash, representing your device fingerprint
      // an array of FP components
    })
  })
}

// import fingerprint from "./fingerprint"
machine_id = await fingerprint()

MD5

[node-md5 -
a JavaScript function for hashing messages with MD5 ](https://github.com/pvorb/node-md5/)

表单提交密码时候,需要做 MD5 处理

//yarn add md5
import md5 from "md5"

md5(this.sources.password.trim())

版本号比较

/**
 * Simply compares two string version values.
 *
 * Example:
 * versionCompare('1.1', '1.2') => -1
 * versionCompare('1.1', '1.1') =>  0
 * versionCompare('1.2', '1.1') =>  1
 * versionCompare('2.23.3', '2.22.3') => 1
 *
 * Returns:
 * -1 = left is LOWER than right
 *  0 = they are equal
 *  1 = left is GREATER = right is LOWER
 *  And FALSE if one of input versions are not valid
 *
 * @function
 * @param {String} left  Version #1
 * @param {String} right Version #2
 * @return {Integer|Boolean}
 * @author Alexey Bass (albass)
 * @since 2011-07-14
 */
versionCompare = function (left, right) {
    if (typeof left + typeof right != 'stringstring')
        return false;

    var a   = left.split('.')
        , b = right.split('.')
        , i = 0, len = Math.max(a.length, b.length);

    for (; i < len; i++) {
        if (( a[i] && !b[i] && parseInt(a[i]) > 0 ) || ( parseInt(a[i]) > parseInt(b[i]) )) {
            return 1;
        } else if (( b[i] && !a[i] && parseInt(b[i]) > 0 ) || ( parseInt(a[i]) < parseInt(b[i]) )) {
            return -1;
        }
    }

    return 0;
}

当你兴高采烈地下载完 Git 仓库中的项目,端起红茶,敲下 yarn 准备开发。不久后你就会发现满屏幕的 error

这时候我就想起一句名言

有时生活就像石头,会给你迎头一击。 —— 乔布斯

面对国内网络状况,即使使用 Yarn 也不能快速地拉取依赖包,多数因为网络状态不佳,下载错误导致的构建失败:

[4/4] Building fresh packages...
info There appears to be trouble with your network connection. Retrying...
error \node_modules\node-sass: Command failed.
  • 网络问题导致的 node-sass 下载失败
  • 部分资源指向了托管在 s3.amazonaws.com 上的 github
  • 依赖库损坏,校检错误

删除项目冗余文件(开发环境)

删除依赖产生的错误配置和文件 node_modules/ package-lock.json yarn.lock

方案一 创建 .npmrc 或 .yarnrc

如果在 CI/CD 上出现被墙问题,最好通过配置 .yarnrc 文件的方式,一步解决拉取依赖包的问题。

[4/4] Building fresh packages...

在项目根配置 .yarnrc 文件,文件会合并覆盖掉全局的配置,使用 yarn config list 可以查看当前的 Yarn 配置项。

registry "https://registry.npm.taobao.org"

sass_binary_site "https://npm.taobao.org/mirrors/node-sass/"
phantomjs_cdnurl "http://cnpmjs.org/downloads"
electron_mirror "https://npm.taobao.org/mirrors/electron/"
sqlite3_binary_host_mirror "https://foxgis.oss-cn-shanghai.aliyuncs.com/"
profiler_binary_host_mirror "https://npm.taobao.org/mirrors/node-inspector/"
chromedriver_cdnurl "https://cdn.npm.taobao.org/dist/chromedriver"
puppeteer_download_host "https://npm.taobao.org/mirrors"

gist - used yarn config to fix network connection err


方案二 设置淘宝 NPM 镜像

通过命令的方式设置本机的 Yarn 配置文件,将仓库源服务器指向淘宝提供的镜像:

yarn config set registry https://registry.npm.taobao.org -g

yarn config set sass_binary_site http://cdn.npm.taobao.org/dist/node-sass -g

方案三 使用代理

使用一个 HTTP/S 代理可以顺利地下载好依赖文件

yarn config set proxy http://127.0.0.1:23333

# 下载完成后删除 http 代理
yarn config delete proxy

The engine "node" is incompatible with this module

info [email protected]: The platform "win32" is incompatible with this module.
info "[email protected]" is an optional dependency and failed compatibility check. Excluding it from installation.
error [email protected]: The engine "node" is incompatible with this module. Expected version ">=4 <=9". Got "10.15.1"
error Found incompatible module
info Visit https://yarnpkg.com/en/docs/cli/install for documentation about this command.
yarn --ignore-engines

yarn config set ignore-engines true

参考资料

关于安装 node-Sass 报错的解决记录

安装 node-sass 的正确姿势

淘宝 NPM 镜像

npm的.npmrc文件在哪里?缓存及全局包文件在什么位置?

Node v10.0.0 error Found incompatible module, [email protected]: The engine "node" is incompatible with this module. Expected version ">=4 <=9"

.yarnrc | Yarn

registry "https://registry.npm.taobao.org/"
cache-folder "E:\\yarn"
disturl "https://npm.taobao.org/dist"
ignore-engine true
ignore-engines true
lastUpdateCheck 1602300083813
sass_binary_site "https://npm.taobao.org/mirrors/node-sass/"
phantomjs_cdnurl "https://npm.taobao.org/dist/phantomjs"
electron_mirror "https://npm.taobao.org/mirrors/electron/"
sqlite3_binary_host_mirror "https://foxgis.oss-cn-shanghai.aliyuncs.com/"
profiler_binary_host_mirror "https://npm.taobao.org/mirrors/node-inspector/"
chromedriver_cdnurl "https://cdn.npm.taobao.org/dist/chromedriver"
puppeteer_download_host "https://npm.taobao.org/mirrors"

因为复制硬盘后忘记修改分区,导致 Windows 找不到原位置的 User 用户文件夹。

在登录界面用户头像也变成默认的,输入正确的密码后便提示:

User Profile Service服务未能登录。

无法加载用户配置文件。

下意识就知道是路径不存在,导致配置文件读取失败。

被挡在登录界面,进不了桌面。

安全模式

只好尝试进入安全模式,点击重启前按住 Shift 键(7 是 开机时按住 Shift + F8 ),转圈后进入蓝色背景,

依次点击 疑难解答 - 高级选项 - 启动设置 - 重启

再次进来的时候敲 4) 就可以进入全模式啦。

很快,右下角便提示:

windows不能加载用户的配置文件,但是用系统的默认配置让您登录。

修改为正确路径

这里先用 DiskGenius 或者 PartAssist 将复制后的盘符更改为原先的 E: 盘。

但当前使用的用户配置是临时的,需要手动指定配置目录。

注册表

在安全模式中 通过

WIN + R regedit 打开注册表,定位到这个路径:

HKEY_LOCAL_MACHINE\SOFTWARE\Microsoft\Windows NT\CurrentVersion\ProfileList

image

  • 删除 default 项
  • 修改 ProfilesDirectory 到正确的 User 路径(一般为系统盘下的用户文件夹)
  • 修改 Public 到正确的 User\Public 路径

重启

重启 2 次之后会加载启动项,拷贝硬盘引发的问题也解决了。

起于安全

跨域请求(CORS)的响应在特定的情况下被浏览器拦截,这是因为请求了一个与当前域或端口不同的资源。所以通过 JavaScript 操控的 XMLHttpRequestFetch API 都会受到跨域限制。

这样一来,我们在编写 Web 程序时只能从加载同一域请求 HTTP 资源,除非 HTTP 响应头中指定了:

Access-Control-Allow-Origin: *;

它允许 HTTP 服务器声明哪些站点有权限访问该资源。

在浏览器发出跨域请求前,有可能先用 OPTIONS 方法发起一个预检请求来询问服务端是否支持跨域。

反向代理

源服务器不能修改 HTTP 响应头 ?

在接入后端 API 时,无法即时部署到线上环境测试,在其他地方部署都会触发 CORS 限制。

将前端代码转移到测试服务器上,使用 Nginx proxy_pass 来代理需要测试的 API :

server {
    listen       80;
    server_name  test.misaka.im;
    root         /var/www/html/test/public;
    index        index.html index.htm index.php;

    location ^~/jiushou/ {
        rewrite     ^/jiushou/app/(.*)$ /$1 break;
        proxy_pass  https://api.jiushouguoji.hk/app/;
    }
}

访问 test.misaka.im/jiushou/ 的请求就会被转发到 https://api.jiushouguoji.hk/app/ 上。

跨域代理

但这样并没彻底解决CORS 限制的问题,每次都要将代码部署到 test.misaka.im 上才能进行测试。

反向代理时加入 HTTP 头,这才是中规中矩的做法:

server {
    listen       80;
    server_name  test.misaka.im;
    root         /var/www/html/test/public;
    index        index.html index.htm index.php;

    location ^~/jiushou/ {
        rewrite     ^/jiushou/app/(.*)$ /$1 break;
        proxy_pass  https://api.jiushouguoji.hk/app/;
    
        if ($request_method = 'OPTIONS') {
            add_header  Access-Control-Allow-Origin *;
            add_header  Access-Control-Allow-Methods 'GET, POST, OPTIONS';
            add_header  Access-Control-Allow-Headers DNT,User-Agent,X-Requested-With,If-Modified-Since,Cache-Control,Content-Type,Range;
            add_header  Access-Control-Max-Age 1728000;
            add_header  Content-Type 'text/plain; charset=utf-8';
            add_header  Content-Length 0;
            return      204;
        }
    
        if ($request_method = 'POST') {
            add_header  Access-Control-Allow-Origin *;
            add_header  Access-Control-Allow-Methods 'GET, POST, OPTIONS';
            add_header  Access-Control-Allow-Headers DNT,User-Agent,X-Requested-With,If-Modified-Since,Cache-Control,Content-Type,Range;
            add_header  Access-Control-Expose-Headers Content-Length,Content-Range;
        }
    
        if ($request_method = 'GET') {
            add_header  Access-Control-Allow-Origin *;
            add_header  Access-Control-Allow-Methods 'GET, POST, OPTIONS';
            add_header  Access-Control-Allow-Headers DNT,User-Agent,X-Requested-With,If-Modified-Since,Cache-Control,Content-Type,Range;
            add_header  Access-Control-Expose-Headers Content-Length,Content-Range;
        }
    }
}

现在所有由 test.misaka.im/jiushou/ 发回的响应都能顺利被浏览器接收了。

参考

CORS on Nginx - https://enable-cors.org

HTTP访问控制(CORS) - MDN

nginx解决跨域

2016 年初,对移动端了解甚少,不得不编写长篇的 @media 媒体查询,来适配不同屏幕宽度的设备。

如何适配移动设备,一直以来是 Web 前端头疼的问题, lib-flexible 库从设备密度、分辨率、缩放比例等问题分析移动端适配的需求

在开发之前,我们有必要仔细观察一下,现实中存在的问题

设备像素

我们常用的 PC 及 Mac 电脑,系统设置中最佳的显示分辨率可能是 1920*1080 Full HD ,这恰好说明了该显示器(屏幕)横向拥有 1920 个彩色点,
纵向拥有 1080 个彩色点,决定了该显示器一次描绘图像的多少。

上面1920*1080 Full HD的显示器就可以绘制横纵排列不同颜色且长宽为 192*108 的矩形 100 个。

如果分辨率是 3840*2160 QFHD,就可以一次性描绘横纵排列不同颜色且长宽为 192*108 的矩形 400 个。

像素密度

显示器中,我们说看见的图像是有若干个三色像素点组成的。像素密度是指单位面积上像素点的指数,其单位是 PPI 所以单位面积中像素越多,该显示器能显示更精细的图像。

其计算公式是:

image

image 为屏幕对角线的分辨率

image 为屏幕横向分辨率

image 为屏幕纵向分辨率

image 为屏幕纵向分辨率

比如屏幕尺寸为 4 寸的 iPhone 5,分辨率为1136*640,像素密度为 326PPI ;而分辨率为1920*1080的家用 21.5 寸显示器,像素密度仅仅为 103PPI

CSS 单位 Rem

相对于 <html> 根元素的 font-size 来计算得出的实际值

html {
    font-size: 12px;
}

div {
    width: 2rem; //12px * 2 = 24px 
}

现状

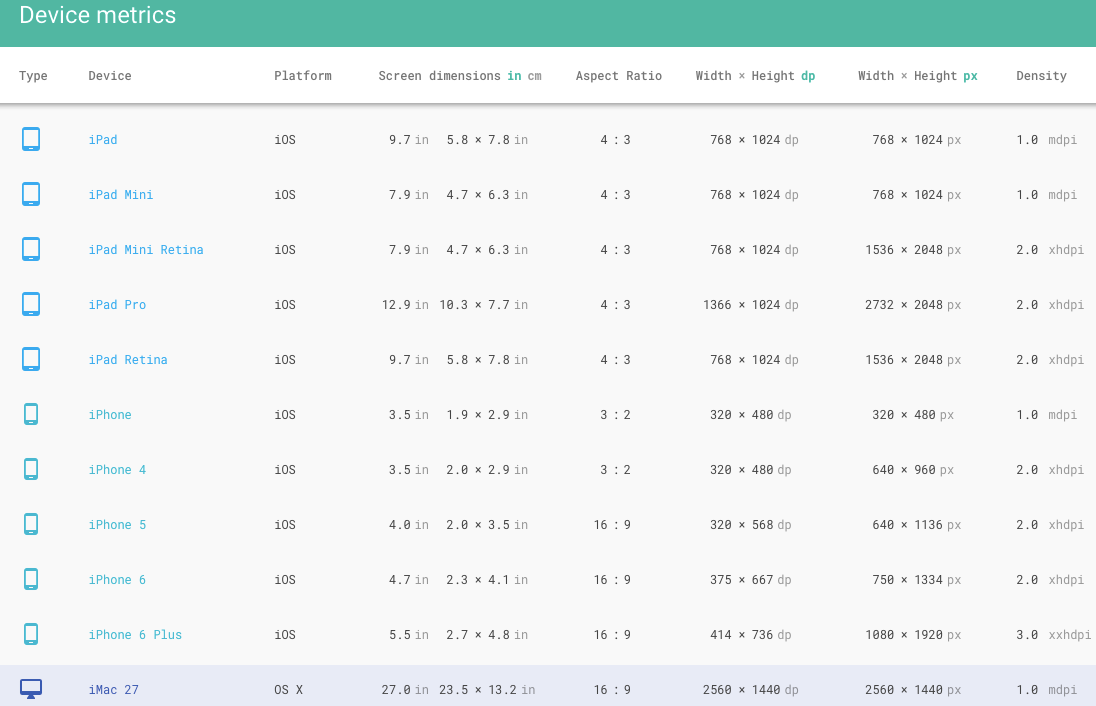
在移动设备上使用传统的 CSS 单位来开发正变得步步艰难。如果你感觉不到设备的差异,下图可能会让你感到惊讶:

image

大量 iOS 和 Android 阵容的设备,拥有由不同的像素密度和分辨率(比例)。

诡异的屏幕比例和过高的分辨率,导致 %px 单位配合 @madia 使用时兼容性变差

从传统 PC 开发页面的老单位,用在移动开发时变得寸步难行。

从设计到实现,通常设计稿按照一台标准屏幕尺寸来进行设计。如 iPhone 6 ,一页设计图的尺寸即是 750*1334 ,但编程上暴露的 设备尺寸却是 375*667,其分辨率相差了一倍的原因就是 Retina屏幕较高的PPI ,它可以显示更精细的图像。

设计稿

给到的是 iPhone 6 尺寸的设计稿,等于从设备中截图得到的图片,分辨率750*1334 比例为 16:9。一些全面屏 18:9 的设备,将很难按唯一设计稿进行适配。

因为 iPhone 6 的硬件分辨率是 2 倍于编程分辨率的,设计图上的元素尺寸是以 375*667 为准来取值。

参考文章

使用 Flexible 实现手淘 H5 页面的终端适配 — 大漠 2015/11/19

amfe/lib-flexible v0.3.2

指尖上行